在今年的3/14,Let’s Encrypt宣布了支援wildcard憑證(文章出處)。
所以也順便更新一下這篇文章,追加如何利用Let’s Encrypt的wildcard憑證。
因為取得wildcard憑證時必須在DNS設定TXT紀錄以取得Let’s Encrypt的授權,所以第一次的設定變得稍微麻煩(因為要特別去DNS的管理追加修改TXT紀錄)。
不過也因為透過DNS的TXT紀錄來取得認證的關係,不再需要在Nginx中設定讓/.well-known/acme-challenge/公開及其對應的位置。
加上因為是wildcard的憑證,所以更是一勞永逸。
取得Certbot
透過Let’s Encrypt的github的repository來取得certbot
$ sudo git clone https://github.com/certbot/certbot /opt/letsencrypt一樣的,我將複製下來的repository放在/opt/letsencrypt。
取得wildcard憑證
$ sudo ./certbot-auto certonly --server https://acme-v02.api.letsencrypt.org/directory --manual --preferred-challenges dns -d *.example.com -d example.com這邊我就以example.com最為範例。
重點就3個
--server https://acme-v02.api.letsencrypt.org/directory--preferred-challenges dns-d *.example.com -d example.com,wildcard不包含example.com所以要另外加上。
另外必須提一下,webroot不支援取得wildcard憑證(不過用DNS來取得授權的話也沒有必要用它了)。
當輸入上述取得憑證的指令之後,大部分的對話視窗的選項就如何選擇都很明顯,這邊就不再贅述了。
比較不一樣的事會出現下面要你去DNS的管理介面增加/修改TXT紀錄(有兩次)。
下列TXT的值我用*來馬賽克一下
第1次
- - - - - - - - - - - - - - - - - - - - - - - - - - - - - - - - - - - - - - - -
Please deploy a DNS TXT record under the name
_acme-challenge.example.com with the following value:

AuTtMz4ALMrW1FVTyx*************************

Before continuing, verify the record is deployed.
- - - - - - - - - - - - - - - - - - - - - - - - - - - - - - - - - - - - - - - -
Press Enter to Continue
第2次
- - - - - - - - - - - - - - - - - - - - - - - - - - - - - - - - - - - - - - - -
Please deploy a DNS TXT record under the name
_acme-challenge.example.com with the following value:

UKTWn7rbq-0TabFFVO*************************

Before continuing, verify the record is deployed.
- - - - - - - - - - - - - - - - - - - - - - - - - - - - - - - - - - - - - - - -
Press Enter to Continue這邊需要注意一下,可以使用dig _acme-challenge.example.com txt來確認設定的TXT紀錄已經反應了沒有,
若是還沒反應就按Enter繼續的話有可能會造成取得憑證失敗。
dig _acme-challenge.example.com txt去出現很多資訊,其中有ANSWER SECTION:,確認這個section的值是不是你設定的值就好。
Joeys-MacBook-Pro:~ Joey$ dig _acme-challenge.example.com txt

其他省略...

;; ANSWER SECTION:
_acme-challenge.joeyliu.net. 0	IN	TXT	"UKTWn7rbq-0TabFFVO*************************"

其他省略...
最後成功的話會出現下列的訊息
Waiting for verification...
Cleaning up challenges

IMPORTANT NOTES:
 - Congratulations! Your certificate and chain have been saved at:
   /etc/letsencrypt/live/example.com/fullchain.pem
   Your key file has been saved at:
   /etc/letsencrypt/live/example.com/privkey.pem
   Your cert will expire on 2018-10-13. To obtain a new or tweaked
   version of this certificate in the future, simply run certbot-auto
   again. To non-interactively renew *all* of your certificates, run
   "certbot-auto renew"
 - If you like Certbot, please consider supporting our work by:

   Donating to ISRG / Let's Encrypt:   https://letsencrypt.org/donate
   Donating to EFF:                    https://eff.org/donate-le
更新Nginx的SSL設定
這邊就不贅述了,繼本上就是將下列ssl_certification相關檔案位置的設定變更為剛剛取的憑證的位置就可以了。
ssl_certificate /etc/letsencrypt/live/example.com/fullchain.pem;
ssl_certificate_key /etc/letsencrypt/live/example.com/privkey.pem;
ssl_trusted_certificate /etc/letsencrypt/live/example.com/chain.pem;
若是還沒設定過SSL的話,可以參考這篇文章的設定方法。
更新完之後,記得在透過sudo service nginx reload將更新的設定反應。
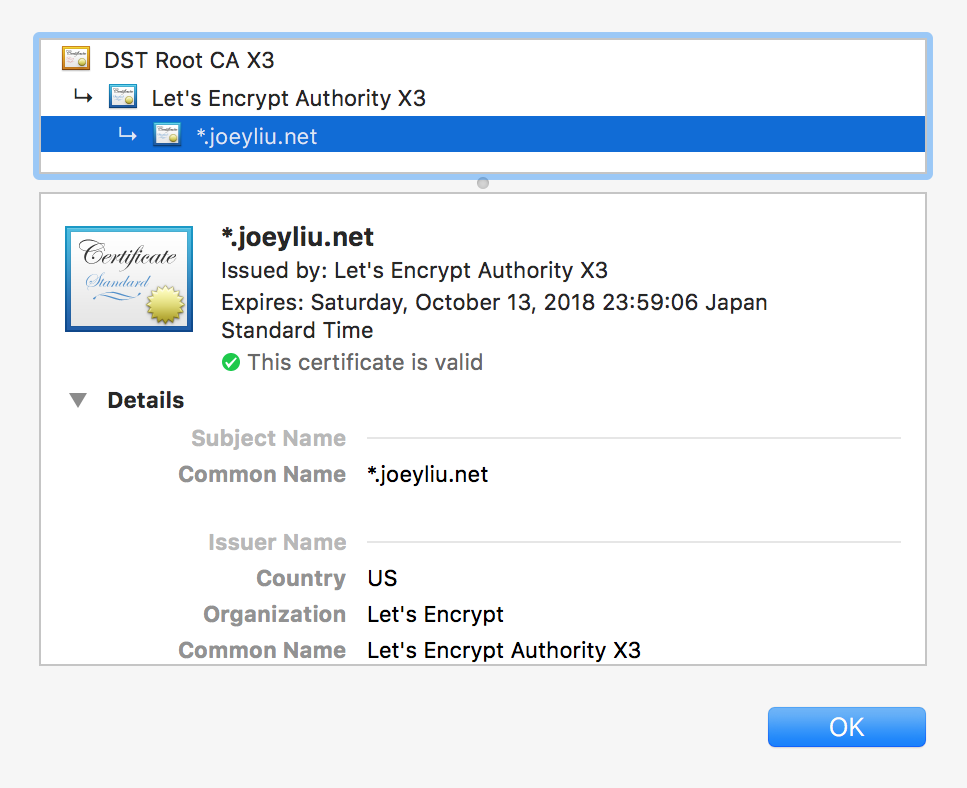
最後,可以到自己設定的網頁去確認HTTPS的憑證是不是wildcard。
設定自動更新憑證:crontab-auto
由於Let’s Encrypt所提供的憑證的有效期限只有3個月,這邊將利用crontab的排程來自動更新Let’s Encrypt的憑證。利用sudo crontab -e來開啟crontab的編輯模式並寫入下列內容。(第一次開啟的話會讓你選擇用哪個編輯器,這邊我選擇nano。)
# m h  dom mon dow   command
30 2 * * 1 /opt/letsencrypt/certbot-auto renew --post-hook "service nginx reload" >> /var/log/le-cert-renew.log上述內容的意思是每週一的2:30(30 2 * * 1)時執行/opt/letsencrypt/certbot-auto renew --pre-hook "service nginx stop" --post-hook "service nginx start" >> /var/log/cert-renew.log。/opt/letsencrypt/certbot-auto renew為更新憑證的指令。 --post-hook "service nginx reload"為當憑證更新後執行""內的命令,service nginx reload也就是讓Nginx重新讀取設定檔。最後 >> /var/log/le-cert-renew.log也就是將執行時的log儲存到 /var/log/le-cert-renew.log。
刪除特定網域的憑證:certbot-auto
若是已登錄憑證的網域之中,其中一個網域失效的話,可以透過下述指令將不需要憑證的網域刪除。
$ /opt/letsencrypt/certbot-auto delete -d example.com
Saving debug log to /var/log/letsencrypt/letsencrypt.log

Which certificate would you like to delete?
-------------------------------------------------------------------------------
1: example.com
2: test.example.net
3: www.example.net
-------------------------------------------------------------------------------
Select the appropriate number [1-3] then [enter] (press 'c' to cancel): 1

-------------------------------------------------------------------------------
Deleted all files relating to certificate example.com.